The Exterminator
Winter's coming. A gorgeous indian summer ended abruptly a few weeks ago with thick snow falling on yellow leaves still clinging to branches. It was time to shelve projects at the Lookout until next spring and to start scratching up snowed up rock; time to experience the mountains in their wintry guise. Last Saturday night Jon and I bailed from yet another attempt on a big new mixed line. All day clouds of spindrift engulfed us at regular intervals, turning something as simple as rummaging inside the pack at a stance into a carefully timed operation. After five rappels by headlamp we finally touched down on a steep snow slope. Our approach tracks were all but obliterated, erased by heavy sloughs from the wall above. What two months ago was scree crisscrossed with sheep tracks had suddenly become ominous avalanche terrain. After postholing back across gully after lee-loaded gully, we breathed a sigh of relief upon finding ourselves again among dense, friendly trees. Winter had indeed returned to the Rockies.
And speaking of winter, I'm reminded of a new mixed line some friends and I established on the Trophy Wall last season. At the time, with spring in the air, I didn't think many people would be interested in yet more ice after already nearly six months of it. But now, with wide-eyed climbers looking for fresh icicles everywhere, the information below might be of interest. Bring on the ice!
The Exterminator (4 pitches, M7+ WI5+)
FA: Eric Dumerac, Juan Henriquez, Simon Parsons and Raphael Slawinski, winter 2012.
The Exterminator is a variation to the ultraclassic Terminator. It joins that route halfway up its second pitch, and as such should be climbable most seasons. The mixed climbing is mostly bolt protected, but a small rock rack comes in handy.
Pitch 1 (M6+): Locate a line up bolts up a right-facing corner some 10 metres left of the Terminator dagger. Climb the corner for a few metres, then exit left onto some ice splatters. Continue to a small stance and belay from one or two of the protection bolts and/or some small gear.
Pitch 2 (M7+): Follow bolts up and left toward a V-groove with thin drytooling. Climb the groove and right-facing corner above past a pin, a bolt and some gear placements to a small stance and a ring-bolt belay.
Pitch 3 (M7+ WI5+): Climb the crack above past a few fixed pins and some gear placements to a bolt-protected overlap arching back right toward the ice of the Terminator. Continue up funky, mushroomed ice to a cave belay left of the last pitch of that route.
Pitch 4 (WI5): Climb the last pitch of the Terminator.
Gear: A dozen draws (including some shoulder-length slings), cams from green C3 to gold C4, and screws for the Terminator.
The Bow Valley on the beautiful late winter day from the Trophy Wall approach. Photo: Juan Henriquez.
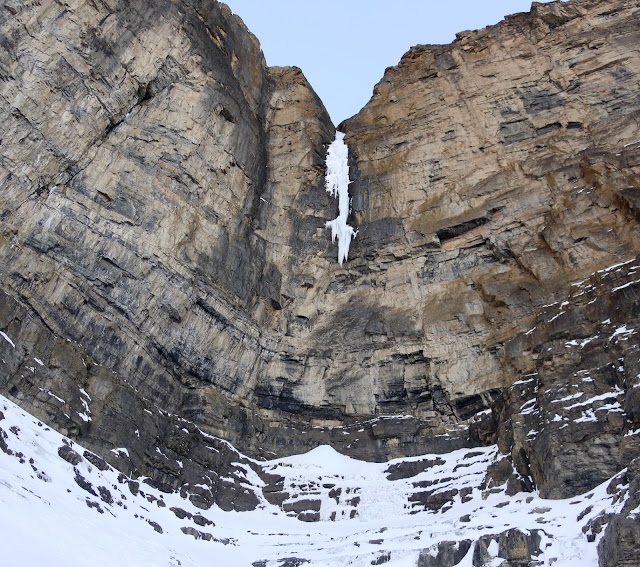
The Trophy Wall. It doesn't get much more classic than that!
Juan Henriquez pulling onto the mushrooms on the first pitch...
... and getting off of them a few metres higher.
Raphael Slawinski starting up the second pitch... Photo: Juan Henriquez.
... and Juan Henriquez coming up the V-groove higher up on the pitch.
After some technical torquing and fancy footwork, the fat ice on the third pitch provides welcome relief. Photo: Juan Henriquez.
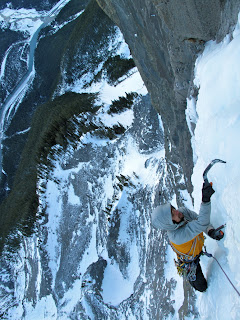
Juan Henriquez nears the belay below the last pitch of the Terminator, with the Bow River far below.
The Trophy Wall with the line of The Exterminator marked in red.


Very nice indeed. Shame I don't live in Canada :) A quick question about the red rope; is it for hauling a backpack/rappels?
ReplyDeletejacek.
Yes, the red rope is a 7 mm static line that I use for hauling and rappelling. Most of the time I prefer using a single lead rope paired with a tag line, rather than double ropes. A single rope simplifies rope handling compared to doubles, and a tag line is nice for hauling if the climbing is hard enough that it'd be a pain to second with a pack. Having something like a Ropeman along makes hauling easier than hand-over-handing. Finally, if the climb is not too hard and the descent is a walk-off, I'll dispense with the tag line and just bring a single lead line.
ReplyDeleteHi Raphael,
ReplyDeleteThanks for the article. What size is your lead rope? How long is the static line compared to the lead line to compensate for stretch vs. no stretch? And finally, which knot do you use to bind the ropes together for rappel?
Thanks,
Scott
Scott,
ReplyDeleteI like leading on a skinny rope, 9.5 mm or under (I really like my 8.9 mm, but I tend to save it for special occasions). I generally use a 7 mm tag line, either a Dyneema cord or one strand of a twin rope. Either way the tag line is usually around 60 m long, mated with a 60 or 70 m lead rope. For joining the ropes together I use a WELL-DRESSED overhand knot with LONG TAILS, with a backup overhand if I'm feeling especially paranoid. Having said that, I tend to be more paranoid about ropes getting stuck than about them coming untied, so I usually go with just a single overhand (and have never noticed any creep or other bad behaviour).
I hope that helps,
Raphael
This comment has been removed by the author.
ReplyDeleteAppreciate yoou blogging this
ReplyDelete